Wednesday 29 October 2014

High key and low key lighting

High & low key lighting.

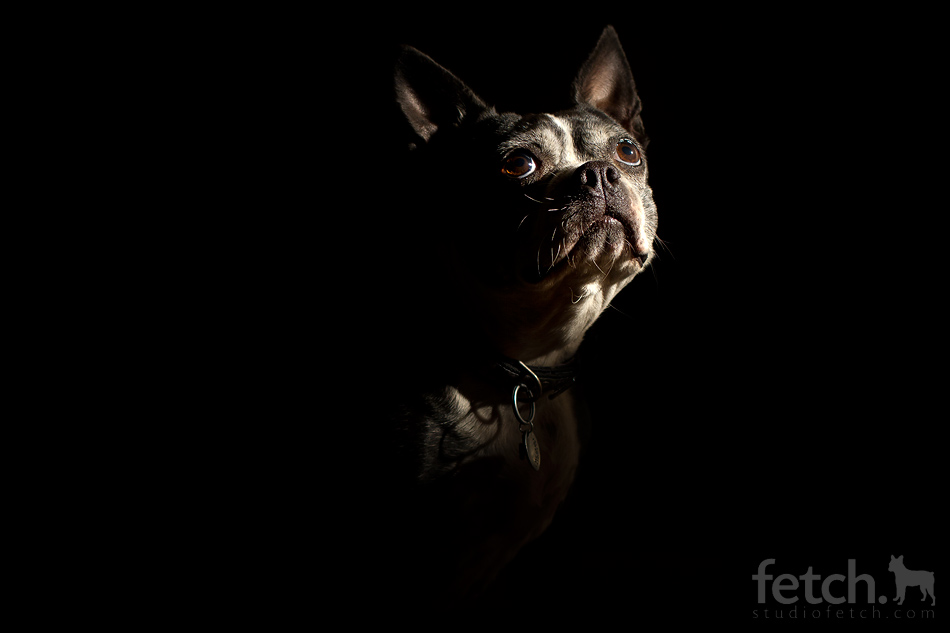
  • Low key lighting produces dramatic lighting effects caused by strong directional light from one side of the subject, this causes deep shadow areas. For low key lighting to work there needs to be no background lights, darker backgrounds work best. Sometimes with low key lighting 1-3 flash units are used, but only one is used as the main source, the others are fillers so they're set on a low intensity, sometimes instead of using more flash units reflectors are used. 
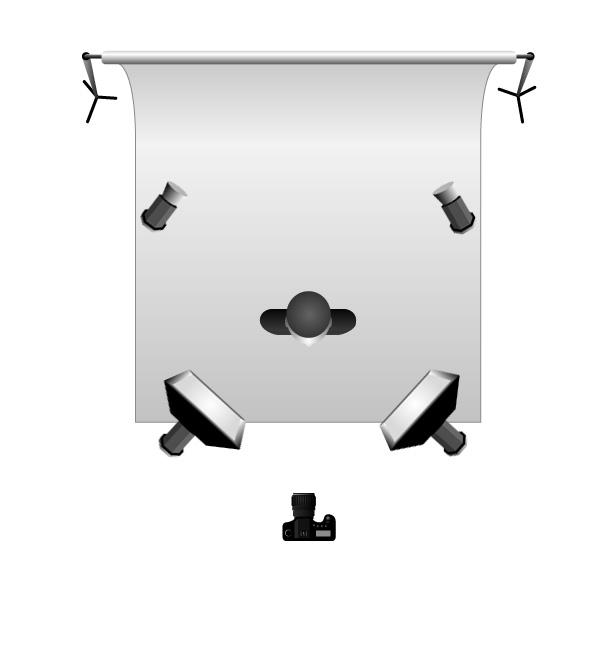
Low key lighting set ups .Flash head and reflector will produce shadows. 

  • High key lighting is the opposite of low key, the background needs to be over-lit making it pure white. Usually two lights are used for the background and they're normally two stops greater then the front lights. In addition a light table can be used to back-light the subject to increase tonal definition and colour. 
                                     High key lighting set up, over lit background.


Examples of high lighting:


Examples of low key lighting:


Equipment list.


  • Flash unit. - Its used to produce a flash or artificial light. It also helps illuminate a dark scene. Other uses are it helps capture fast moving objects.
  • Snoot. - Its an accessory to the bulb, usually used to back light a models head, giving a spot light effect. It controls which areas are illuminated. 
  • Reflective hood.- It goes on the end of the lens like a lens hood, it blocks out the sun or other light sources to prevent glare and lens flare. 
  • Barn doors - They're usually fixed onto studio lights, they have 4 hinged doors around the light source. They're usually used to shape light, they don't have any effect on the hard/softness of the light.
  • Light stand - The basic use of these is to position all different types of lighting, clamp on reflectors, diffusers. Or hold backgrounds and props. 
  • Soft box - Its a type of photographic lighting device. Its used to vary soft light by directing light through some diffusing material or bouncing the light off a second surface to diffuse the light.
  • Diffusive umbrella - This helps illuminate the scene, the flash is directed to the underside of the umbrella (white side.) This allows some light to pass through and illuminate the surrounding so rather then reflected diffusion its direct diffusion. 
  • Reflective umbrella - A flash of light is directed to the black under side of the umbrella, this causes the light to be reflected back to the scene. The open parabolic shape diffuses light over a wider area. The light is scattered because of this.
  • Reflectors - It is a surface used in photography and cinematography to redirect light towards any given subject or scene.
  • Trigger and receiver - Its used in flash photography, they help co-ordinate the flash of the light with when you take a shot. The trigger is on the camera and the receiver is placed on the light.
  • Light meter - Its a device used to measure the amount of light exposed. It usually also allows the photography to determine the shutter speed & f-number for optimum exposure.

Health & safety 

  • Make sure that you carry all equipment by the specific handle, or correct procedure. 
  • Always uncoil wires when you're using the equipment. 
  • Don't mess around with the equipment, especially the stands in case they fall.
  • Place bags under tables so people don't fall.
  • Be careful of equipment as they can heat up during use


Friday 24 October 2014

illustrator

Illustrator

This is a step by step guide on how to use the pen, shape and colour options on illustrator.


  • First open up illustrator, select file at the top and click new. This brings up the box you see above. Decide whether you want your page landscape or portrait then click okay.


  • Once I selected my page, i went to file and opened up my kandinsky image, as id be using it to help me understand the pen, shape and colour tool. 


  • Once I'd opened this I created a second layer, i placed this under the top, (layers work in hierarchy) so even though I'd be drawing on the original image it would be tracing it onto the layer underneath. 


Using the tools.


  • Using the pen tool. The pen tool works by connecting anchors. First select the pen tool, then place it where you want the first line segment to be. Click down and then move the mouse over to the next spot and click again, do not drag the mouse. You repeat this procedure of using anchor points to create a continuous lines to draw squares and shapes. To stop the pen tool you you position your mouse over the first anchor point, A circle should appear next to the tool, click down and this will stop the anchor path. 

  • To draw curves with the pen tool, you place an anchor where the curve to changes direction. Position the pen tool where you want the curve to begin and hold down, the first anchor point and the pen tool pointer changes to an arrow head. You then drag to set the slope of the curve segment, then release the mouse.Then position the pen tool where you want the curve to end.


  • For a c shape follow the diagram below. You drag in the direction opposite to the previous line.


  • To draw shapes, first locate the rectangle tool on the side bar. The default tool is the rectangle but this can be changed by clicking and holding the rectangle tool. This reveals a hidden tool bar. Select which ever shape you need. I chose the ellipse tool for drawing circles.


  • To draw a shape you click and grab. To draw a circle you click and grab while holding the shift shift key.


  • For the colour option. You would usually use the fill tool once you've drawn your shapes. Taking a colour from the colour pallet and simply filling in the area. Where I had the original Kandinsky photo I used the eye drop tool to copy the colours off Kandinsky's work.This then changes the colour in the colour fill tool.
  • This was the finished product. I didn't have time to finish it but it gave me the basic understanding of how each tool works.


Colour adjustments screen grabs


Colour adjustment.

This post is to show you how to do colour adjustments on photos on photoshop.
  • First off open up photoshop then up load your image. To find adjustments you go to image => adjustments. This then opens up a list, to start with you want to just play around with brightness/contrast, levels, curves and exposure. 


  • Then proceed to pick one of the adjustments, I first went for brightness and contrast, this changes the dark and light tones within the image. I personally left mine how they originally were. Don't forget to save your changes 


  • The next one was curves. The curves adjustment is probably the most powerful, and it works by tweaking the central line and placing anchors along the path. By changing the path of the original diagonal line you can change the tonal out point on the image, I enhanced the orange within the wings of the butterfly.

Photoshop curves sample window


  • This image shows two anchor points on the curves graph and how each point effects the original image.

  • The exposure adjustment works by adjusting the highlighted end of the tonal scale. It doesn't do much difference to the darker areas, so it was really effective on the wings of the butterfly.


  • The last one is levels, and personally this is my favourite one to play around with because you're only using three main components, a black point, white point and midtone slider. Its shown as a histogram. The black point controls the amount of black in the image and the same happens with the white point. Adjusting the midtone is probably the most important, if you slide it to the left the histogram stretches to the right, which compress the histogram to the left. This brightens the image because the shadows are stretched and the highlights compressed. Visa versa.


  • This was my final outcome once I'd finished playing around with the colour adjustments.


  • I then went a step further to merge two different layers. I made a duplicated layer. You click on the layer icon below the adjustment pallet. 


  • This grab shows what comes up after you click duplicated layer, just naming the layer, press okay then you have the same layer repeated twice. Next to the layers you have little eye icons, click on the eye that belongs to the original layer. This means you only see the effects of the duplicated layer.


  • Next I went back to the adjustments, instead of using the original four I went further down and selected the black and white adjustment, which automatically changes the image to mono chrome. You don't have to make the image black and white you can merge two coloured images.


  • After I made the butterfly monochrome I decided to just merge the layers as they were. To do this there is a button above the layers labelled normal, click on this and it brings up a list of options. These options are different effect on how the layers merge together. Have a play around here and see which effect you like best. 


  • This is my finished result after the merging. 

macro photography

Macro Photography

Macro photography is a term used to describe photos where the subject is recorded as life size or up to 10x bigger. Macro magnification  is often represented as a ratio. 1:1 is considered the standard minimum for true macro. There is a difference between close up and macro photography, close up is where the subject is recorded between one tenth of its actual size whereas macro is life size or up to 10x bigger. 

Method:
  1. We used a DSLR with a 50mm lens, we also added on an extension tube (12mm) for better close up results.
  2. Gather up the rest of your equipment, this consists of a light metre, your small objects, light trigger and receiver. In the studio room you should already have your black & white backdrops/table set up. Along with the basic lighting equipment. 
  3. To set up the camera make sure the focus ring is set to the infinity sign (side ways 8), The aperture should be set to f/11. The depth of field is very small this also brings the image quality down so anything between f/11 -f/16 is an acceptable compromise The ISO at 100 and the shutter speed should be at 1/60.
  4. For the lighting because we're using an extension tube the lighting needs to be half a stop more then the aperture. So since our aperture is at f/11 our lighting needs to be at f/11.5 so test this we adjust the dial on the side of the lighting, place the light metre where you plan to place your object. Than proceed to pressing the light trigger will cause the light to flash, Pressing the bottom button on the light metre will give you a reading and you repeat this process until you get your lighting at f/11.5.
  5. Then place your object on either the white or black table. 
  6. To focus the camera you have to get real close. To bring the camera into focus you need to move back and forth, kind of like on an iphone when you shake your phone to focus the camera. Don'd rush yourself here, take your time to carefully consider where you want your focus point to be. You need to move around until the image is crisp and clear.
  7. Things to consider before taking the photo is: Subject, focusing/depth of field, lighting and exposure. 
  8. Once you're happy, take the photo.
  9.  After you can upload the images onto photoshop and play around with colour adjustment.

Extension tubes.

Extension tubes are used for close up macro work, They usually come in three different sizes- 12/13mm, 20/21mm &31/36mm. You can combine extension tubes to gain an even longer focal length lens.Extension tubes contain no optics, they're hallow tubes that help create a longer focus length. Extension tubes are attached to the main body of the camera, each tube has a different magnification ratio, the higher the magnification the more light that's needed. 
  • Reproduction ratio = focal length of the lens / amount of extension. 
  • An example- 100mm lens / 50mm extension = 1.2 (half life size) 

EQUIPMENT:
  • DSLR
  • Extension tubes.
  • Light trigger & receiver.
  • Light meter.
  • Lighting equipment. 
  • Light table. 
  • Black and white backdrops 
  • Subject (anything small you wish to photograph) 
Here is some close up images produced by following the method above.


scanner

Scanner work.

This experiment was to help understand basic scanning on the mac computers and how to further develop scanned work on photo shop.
How to use a scanner: 
  1. First you've got to make sure your scanner is connected. To do this you connect the USB lead into the port at the back of the mac box.
  2. Once the scanner is connected place your images on the scanner, if its a 3D object place a piece of black paper behind the object to stop light interfering with the scan.
  3. Once the scanner is connected open up photoshop. Go to file and click import. 
  4. This brings up a box, click on preview. This does a preview scan.
  5. Once this is done you then use the selection tool to highlight the ares you which to use.
  6. After you've selected the area of the scan you wish to use it will bring it up on an untitled document in photoshop. 

This is one of my scans. Showing conkers.

Scanography. 

The inspired artist for this is Hong Hao. He was born in Beijing 1965, graduated from the central academy of fine art in 1989. He's mainly a contemporary Chinese artist. His work focuses on scanning objects then editing them in photoshop. His most famous work is a series of pieces named 'my things' what is shown below is just one piece from the series.


Each object in this piece has been scanned then edited in photoshop to give a cartoon like effect. Instead of scanning multiple items I just chose one to focus on one and develop it. I used basic adjustments to try and influence the colour. I didn't get time to try and animate my object, but next time I'll try and develop it that way. To properly understand Hong's style I need to practise in photoshop more. 

Friday 3 October 2014

Aperture


Aperture.

What is aperture? 
  • Aperture refers to the lens diaphragm opening inside the lens, this regulates the amount of light passing through onto the recording medium at the time of exposure.
What is aperture Priority?
  • Aperture priority is a system inside a camera where the aperture is set by the user and the appropriate shutter speed is controlled automatically
F numbers
  • the list of f numbers goes from f/1.8 f/2.0 f/2.8 f/4.0 f/5.6 f/8.0 f/11 f/16 f/22 f/22 f/32 f/64.
  • This picture shows the different aperture opening size according to f numbers.
What is depth of field?
  • Depth of field (DOF) represents the distance between the furthest and nearest objects in a scene that appear clear or sharp in the image. Its basically shows how one object nearer to the lens can be in focus and that fades out to create a fuzzy background or visa versa
  • A large aperture equals a small depth of field f/2 etc. It shows a smaller range of focus.
  • A smaller aperture equals a larger depth of field f/16 etc. There will be a bigger range of focus. More objects in the image will be clearer.
  1. The aperture on this photo I would say would be f/2.8, as the ball in the background is very hazy and blurred, suggesting the focal point to be much closer to the lens. So I'd say the focal point was centred to the number on the ball.
2. As for this photo the depth is much larger, as you can see a further variety of detail which would suggest the aperture is be much larger so maybe for the particular shot I'd estimate the f/number to be at f/22. The focal point for this image is much more centred as the f/number is larger so I'd say the focal point is probably in the middle of the road where the aperture blurs out.
3. For this image the aperture seems to be a lot smaller then the last as the photo itself is much closer compared to the landscape one, but it also seems much more blurred compared to the first image so I'd say the aperture is around f/2 and the focal point is on the second light bulb. As that has the most sharp and defining edges.

 My own photos of aperture and depth of field.

For this experiment I played around with dof and aperture taking a series of shots to see how they both effected each other. For this experiment I used a Nikon D3000.


  • This photo has a aperture of f/3.5 where the flower is the focal point of the image. Where the aperture is larger the focused area is smaller so the surrounding background is blurred out. Only the objects on the same plane as the focus point remain in focus.

  • This photo has a aperture of f/22 as more detail is in focus. This shows that the depth of field (dof) is much larger, for this I also played around with the focus point, I zoomed out on this particular photo so the range of focus is more centred instead of just on the yellow flowers.
  • For this photo I changed aperture to f/8 and the dof. Basically by using this aperture I changed the focal point of the image from the yellow flowers to the grass and leafs in the background. Its kind of a reverse of my first photo.

  • For this image the aperture was set at f/22 and much like my other set of photos I was playing around with the dof but for these I wanted to have more going on within my photo so the dof would be more obvious. Where this was shot at f/22 the focal point is much more central meaning the central area of the flowers was more in focus then the otter edges. More detail can be seen using this aperture.
  • This photo has an aperture of f/3.5 with the focus lens zoomed out to give a clearer shot of the purple flowers. Where the focal point is on the purple flowers that are slightly off centre everything in line with them also comes into semi focus and the background just fades away. The dof is much smaller compared to the previous photo.
  • This photo was the last in the sequence of photos I shot while playing around with aperture and dof. I used a f/8 for this but changed the focal lens by zooming it back in so the area of focus becomes more unclear and un-centred because there is so much going on within this photo. The focal point is definitely still on the front row of flowers but more depth and detail can now be seen behind that because the aperture has gotten smaller whereas the dof has gotten larger.

This set of my own photos shows aperture using a Nikon D3000

  • This photo has a aperture of f/3.5, the areas around the focal point which is the first tree.

  • This photo has a aperture of f/8 and a much larger area has come into focus, mainly the second tree. 

  • This photo has the smallest aperture of f/22, which means a larger range of focus so more objects have become clear.